
Basics of Git version control
About the author
Mg. Phys. Kristaps Bergfelds is a researcher at the Institute of Numerical Modelling (University of Latvia), where his daily duties include acquisition, processing, and plotting of scientific data. Additional to his research, Kristaps teaches programming for physics students (programming and data science basics using Python language). This article is based on Kristaps’ experience and observation on the daily needs of his colleagues and students to collaborate in the development of various programming projects.

Almost anyone who has collaborated with colleagues on creating a text report has encountered version control issues. Often you end up browsing and organizing such documents as document.docx, document_final.docx, document_final_edited.docx, document_final_edited_2_really_completed.docx etc. This process can be confusing, error-prone, and cumbersome for all those involved.
To make this process easier, you can place the document in a place accessible to everyone and edit it collaboratively: either in the form of a cloud document (Google Drive, OneDrive, Dropbox) or in a shared local network folder. Versioning is available on these document sharing platforms so that you can restore an earlier version of your documents if necessary. Edit highlighting is also available to inspect exactly what has changed between versions.
Programmers have been facing very similar problems since the beginning of software development itself – several developers need to interact during program code development, keep track of changes, test various elements of program code, and sometimes obtain earlier code versions. As with text documents, several specialized tools have been developed for controlling code versions, offering a variety of options for specific code development needs, such as the ability to create parallel code development paths and branched version structures.
Currently, the de facto code versioning system standard among programmers is the Git platform. In addition to various technical advantages and increasing popularity, supporting web-platforms (such as GitHub, GitLab, BitBucket) should be emphasized. Therefore, this article is devoted to the use of the Git platform specifically. This article is intended for Windows users who want to take advantage of the versioning system in a graphical interface (rather than through the command line).
The article provides an insight into the basic principles of using Git, shows the required software to be installed in the Windows environment, provides an insight into the sharing of Git repositories with the help of the GitLab portal. For further reading, it is highly recommended to use this free tutorial provided by the Nordic e-Infrastructure Collaboration (NeIC).
Setting up Git on your computer and basic use of repositories
To start using the Git versioning system, you need to install Git for Windows (keep all default settings during installation). Installing this program makes it possible to use Git only in the command-line interface. Further sections of this article will show you how to do this using a graphical interface, however, a brief demonstration of the command-line interface use is given here to illustrate the basics of Git and introduce some terminology.
When you open the installed Git command line (Git Bash), execute the following commands to create a folder whose contents will be subject to versioning control (i.e., a repository will be created). The comments written on each line reveal the essence of the commands.
$ mkdir MyProject    # Create folder
$ cd MyProject       # Change location to the new folder
$ Git init           # Initialize repository
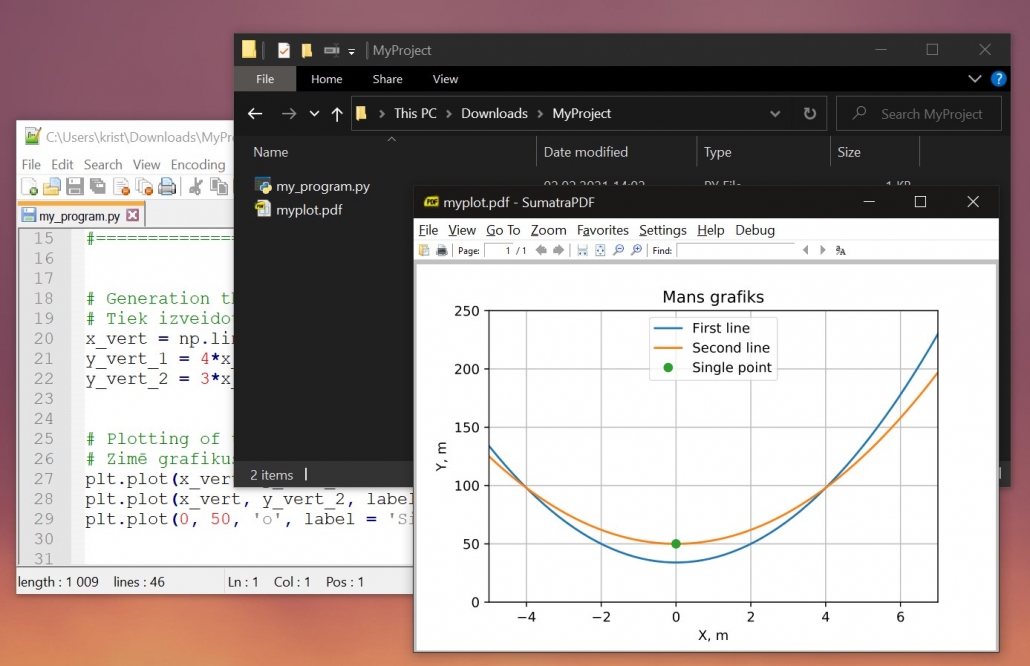
You can place/create program code files in the folder using your usual tools. In the example below, the folder contains a Python script (my_program.py) that plots some mathematical expressions (myplot.pdf).
To preserve the current stage of .py script development in the versioning history, you need to execute commands that (1) add the file to the version control (staging) and (2) mark the changes made in the version history (commit).
git add my_program.py                    # Staging for version control
git commit -m "Initial code development" # Saving changes as a version
Once this is done, you can run the git status command to see what the current state of the repository is from the versioning system’s point of view. The command will show if changes have been made since the last version of the content was committed and if there are files that are not being tracked. In this example, the file myplot.pdf is not tracked, because it is the output of the developed script, the exact content of which is not important. It is important, however, to follow the code of the program that created it.

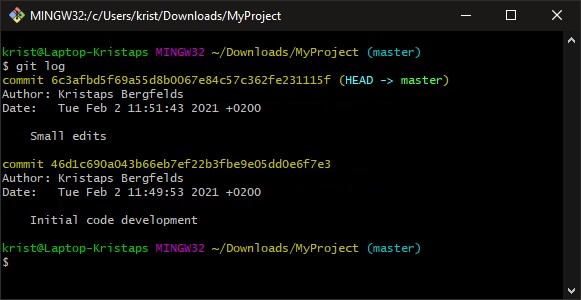
After changing the repository files (e.g., by continuing to develop the program code), the changes are saved by re-executing the already mentioned commands (git add, git commit). When you run the git log command, the version development history is displayed. This example shows that two submissions have been made (‘Initial code development’ and ‘Small edits’).
If you need to undo changes made to the repository, you can run the git restore command. There are many capabilities of Git: you can return the repository to its previous states, you can create parallel branches of development, you can temporarily examine older versions. However, using Git via the command line interface can be inconvenient, frustrating, and unfamiliar to regular Windows users. Therefore, further in this article we look at ways to use Git repositories through a graphical interface.
Using Git Extensions for graphical experience
Installation and configuration
To use the graphical interface to manage Git repositories in Windows, it is recommended to install Git Extensions. To take full advantage of this program, you need to install two additional applications: (1) WinMerge, which will be used to visualize file changes, and (2) PuTTY, which will make it easier to work with remote repositories (e.g., GitLab).
After installing Git Extensions, it is very important to configure all the required program settings – for this purpose, the program settings window offers a convenient checklist. Make sure all settings are shown as valid (green).
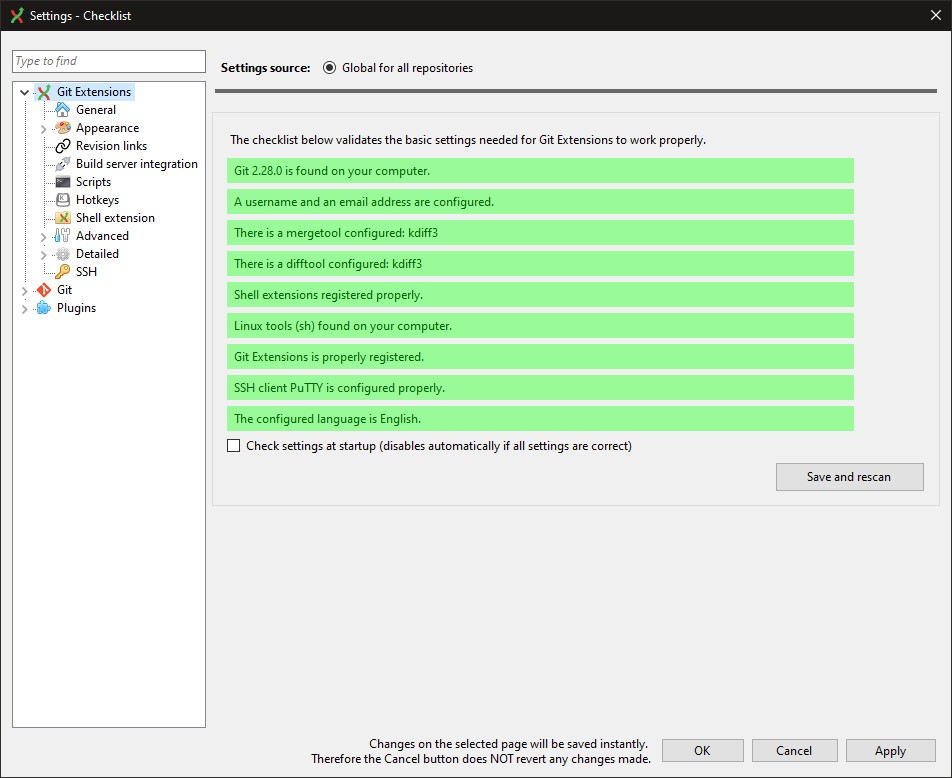
In the ‘difftools’ section select the WinMerge tool mentioned above. Additionally, select ‘PuTTY’ in the ‘SSH’ section of the settings.
Basic usage
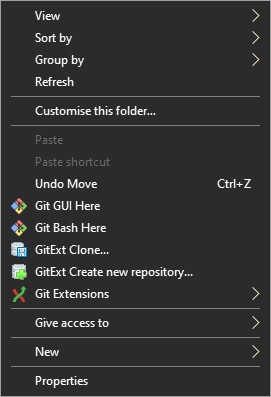
After installing the programs and configuring all the settings, use the Git repositories without the help of the command line are now possible. In any Windows folder, a right-click reveals the options provided by Git Extensions: browse existing or create new repositories, copy (clone) the repository from another location (e.g., GitLab).
In folders where repositories are already located, ‘GitExt open repository’ command is available. This option opens a window where you can review the history of repository changes, see their authors and added comments.
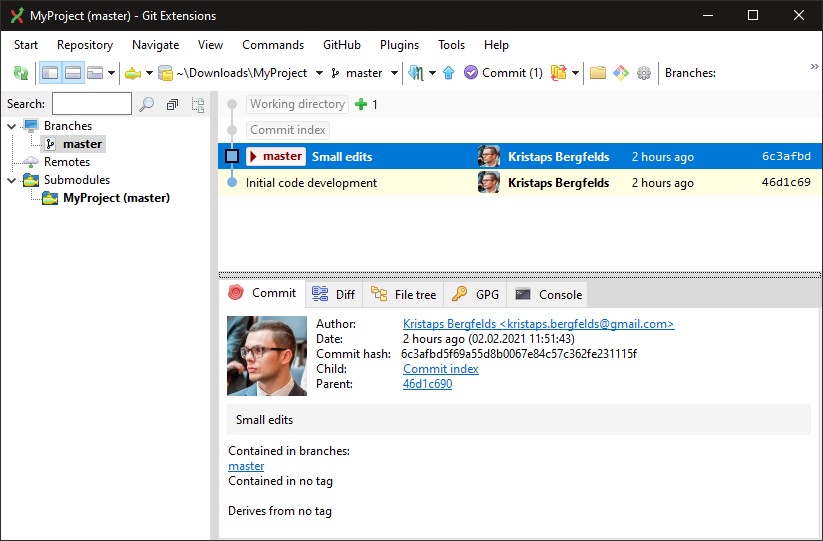
You can click the ‘Commit’ button to create a version of the repository content similarly as shown previously in the command line example. However, in this case, an additional visualization is provided by the Git Extensions environment.
A very valuable and frequently used option is to edit the .gitignore file (Repository / Edit .gitignore), which lists the files and filetypes whose changes to ignore and not subject to version control. In the example provided, PDF file output should be added here.
Using GitLab for collaboration
So far, this article considered only local Git repositories. However, a significant advantage of using a versioning system is the ability to collaborate easily and transparently. That is why several Git-based Internet services have been created with the possibility to deploy and share remote repositories. This section demonstrates the use of one of such services: GitLab.com. It should be noted that the University of Latvia provides a GitLab-based platform git.lu.lv, which can be accessed with a LUIS username and password.
Registering and creating a repository
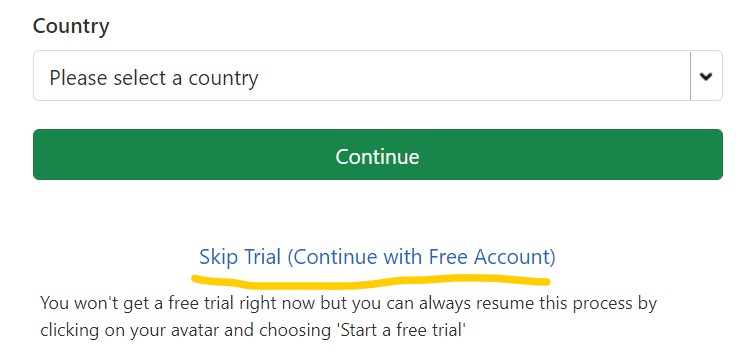
You can register on GitLab with an email or a Google account. The platform is free to use, but you need to notice and use the ‘Skip Trial’ button during registration.
After successful account creation, it is possible to create remote repositories – specify the title, description, privacy level (private, shared to group, public) and other parameters.
Adding an SSH key
To upload (git push) the local repositories to the remote GitLab environment, as well as download (git clone) your private repositories, you need a way to authenticate your local computer to work with your GitLab account. SSH keys are used for this purpose.
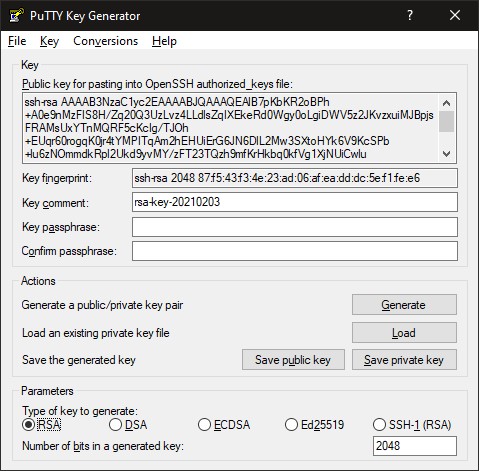
To enable this type of authentication, you need to create a pair of private and public SSH key. A private SSH key is nothing more than a very long and secure password. The SSH public key, on the other hand, is a publicly visible authentication token that matches this password. In fact, it would be more appropriate to call the public key a ‘lock’ which the user can install in a place of his choice – in this case, his GitLab account.
If you have the aforementioned PuTTY program installed on your computer, the PuTTYgen tool is available for you to easily create SSH key pairs. Following the instructions in the program window, it is possible to obtain both the private key (saved in a .ppk file) and the public key (it must be copy/pasted to the GitLab portal section User Settings / SSH Keys).
Cloning remote repositories
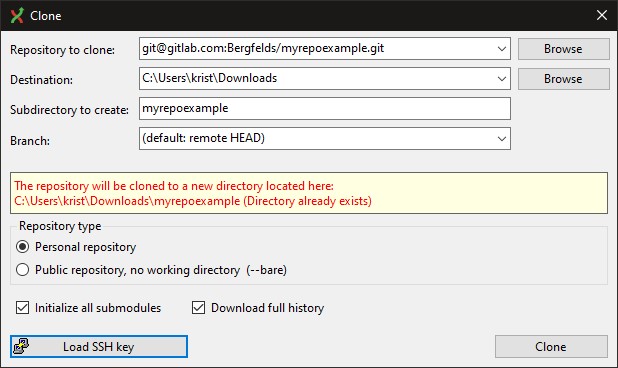
To obtain a repository located on the GitLab portal (including newly created/empty repositories), you need to copy its SSH address.
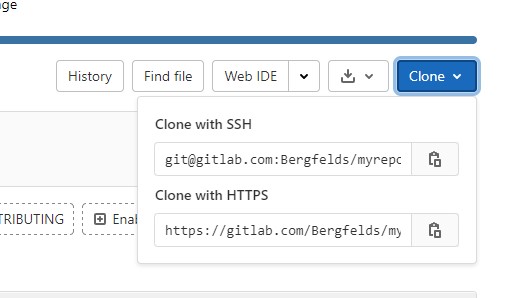
On your computer, right-click within a folder and select the GitExt Clone command. You must specify the address obtained on the GitLab portal and select the appropriate private SSH key for your account. Press the ‘Clone’ button to copy the repository.
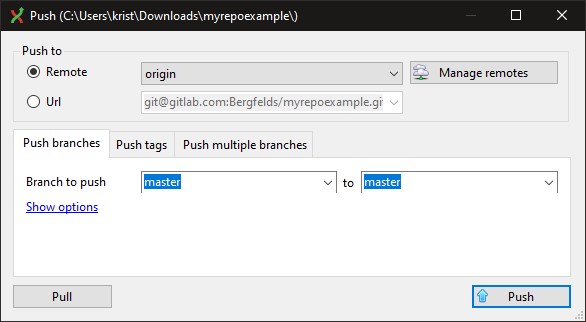
After the successful copy (clone) of the repository, you will be able to continue/start working with its content as demonstrated previously. However, now, in addition to the ‘Commit’ action discussed earlier, there is a ‘Push’ action that uploads versions created in the local repository to the remote location. Similarly, you can perform a ‘Pull’ action that will download changes made by others.
Cloning public repositories
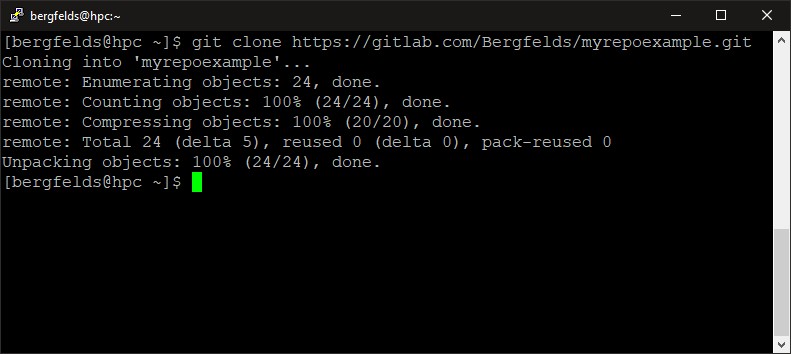
If the repository is set to be public, anyone can download it (git clone) using the repository’s HTTPS address provided on the GitLab platform. In the example below, the public repository shown in this article is downloaded to the INM High Performance Computing Cluster using the command line.
Conclusion
This article provides an insight into working with local Git repositories in the Windows environment by using the Git Extensions GUI. Basics of using GitLab environment, creating remote repositories, performing clone/push/pull operations is also shown. However, the article does not discuss several advantages of the Git system, as well as the GitLab portal. At least one of them should be emphasized before closing this article: project documentation.
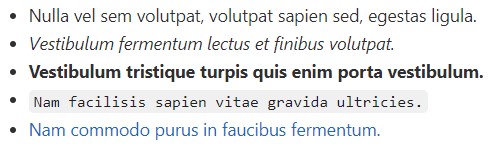
In the GitLab repository interface, you can display the repository documentation using the README.md file. I.e., if the repository contains a text file named README.md, it will be previewed on the GitLab site. These documentation files can be formatted with various text markdown commands.
* Nulla vel sem volutpat, volutpat sapien sed, egestas ligula.
* _Vestibulum fermentum lectus et finibus volutpat._
* __Vestibulum tristique turpis quis enim porta vestibulum.__
* `Nam facilisis sapien vitae gravida ultricies.`
* [Nam commodo purus in faucibus fermentum.](https://modinst.lv)
The text formatting commands shown above, if placed in the README.md file, will be displayed on the GitLab portal as follows:
Hopefully, this article will help you to get started with Git and will allow you to collaborate more efficiently and quickly when working on code projects.